Arm Knitting went viral some years ago. This knitting is on a massive scale. Instead of knitting needles, you use your arms.
The best arm knitting yarns are ‘Jumbo’, ‘Chunky’ or ‘Bulky.’
I reviewed, fact checked and updated this post on May 22, 2023.
Table Of Contents
What Is Arm Knitting?
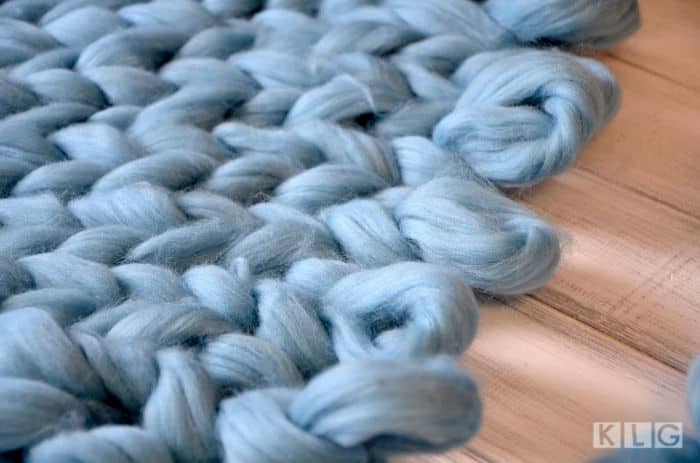
Arm knitting is a unique knitting technique when you use your arms instead of giant-sized knitting needles. The loops of the knitted fabric are super-sized. The thickness of the yarn determines how many stitches fit on your arm. Be prepared to make narrow items.
With Jumbo and super bulky yarn, make arm knitted garments, scarves, a cowl, blankets, toys, and home décor items. This technique is popular for those in a cold climate. With practice, arm knitters create knitted goodies in little time.
Unlike knitting, don’t turn the work when working back and forth. Swap the stitches from your right arm to your left arm. Casting on the stitches on the left arm is better for lefties. Giant or extreme knitting looks amazing, but storing massive needles is hard. Arm knitting is the go!
Beginners find it takes longer than they were led to believe. Jodie from the Design Twins, and Janine from Happy Nesters made an arm knitting blanket and had challenges.
Knitting a blanket isn’t the best beginner project! Knitting with arms takes practice, and no two arms are the same. If you love the look of a pattern and the designer had thinner forearms than you, your blanket may look different.
The diameter of your forearms determines the stitch size. Measure your wrist in millimeters, divide by pi, and you’ve got the ‘needle size’ of your arm.

Tips Before Starting An Arm Knitting Project
- Decide what fiber you want: synthetic or natural. Wool yarns are much more expensive than polyester and the price quickly adds up. How bulky do you want your garment/blanket to be? This determines the weight of the yarn. The best weights are Chunky, Bulky, Super Bulky, Roving, or Jumbo.
- Items you can make: The thickness of the yarn determines how many stitches fit on your arm. Be prepared to make narrow items.
- Prep your yarn: Make sure the yarn you’re using is unwound from the skein. You’ll be twisting the yarn while creating stitches and you don’t want any surprise knots ruining your groove.
- Protect your yarn: If you’re using Super Bulky or Jumbo yarns, spread a clean sheet underneath to keep it tidy. Your lovely merino wool deserves to stay in its best condition.
- Focus is key: Arm knitting requires your full attention. As tempting as it is to watch your favorite show while crafting, it’s best to give this project your undivided attention.
- Prepare for breaks: Have some plastic wrap handy for those much-needed breaks. Just thread it through your stitches and tie the ends together to prevent the stitches from slipping off.
- Bare is better: Having stitches on your bare arms makes the process easier. Feel free to roll up your sleeves!
- Watch your yarn supply: As you near the end of your project, make sure you have enough yarn left (about enough for a row and a half) to bind off. Especially with Jumbo Yarns, the end comes up quickly due to less yardage.
- Keep it tight: Try to cast your stitches onto your forearms as tightly as possible. This results in a nice, even pattern on your blanket.
- Firm up each stitch: After knitting each stitch, cinch it up so it fits snugly on your forearm.
- Careful when casting off: Don’t tie your loops too tight when binding off.
How Do You Arm Knit?
Be prepared to make mistakes, but be kind to yourself.
Casting On Stitches With Arm Knitting
The two Arm Knitting cast-on methods are the “M” and “Loop” Method. Many find the “loop” method easier. I’d opt for the Loop method as demonstrated here.
If you prefer a written tutorial, here you go!
- Make a slip knot: Start by placing all the ends of your yarns together. Treat them as one big, thick strand. About 1.5 yards from the end, make a loop. The working yarn should go over the tail.
- Pull the working yarn through the loop you just made. Pull it tight – voila, you have a slip knot! Place this knot on your right hand, the tail should be closer to you and the working yarn farther away.
- Cast on: Next, you’re going to make a loop with the tail, in a way that the tail hangs in front of the loop.
- Hold the top of the loop with your right hand, put your left hand through the loop and grab the working yarn. Pull this through the loop. The yarn that you held with your right hand can now be dropped.
- Put this new loop over your right hand. To tighten the stitch on your arm, pull the working yarn and tail apart.
- Repeat this process until you have as many stitches as you want.
There you have it! You’ve cast on. Here’s how to continue arm knitting.
- Use your hands to work through the stitches
- Pull the working yarn through the loop to create a stitch
- Place the new stitch on the other arm
- Repeat on the opposite side
- Have the stitches loosely on your arms
- You can tighten them afterward

How Do You Knit A Scarf On Your Arm?
- To knit a scarf on your arm, start by making a slipknot. Continue by casting on loops on your forearm. Using a bulky yarn cast on ten stitches (more if you prefer) on your forearm. You’re ready to knit your first row.
- Hold the yarn to be worked in your right hand. The same hand that has all the cast-on stitches.
- Grab the first loop closest to your hand and slide it over the strand you are holding. This creates a loop.
- Place that loop over to your left hand and tighten it on your left forearm. This is your first knitted stitch.
- Repeat this process until you have moved over all the stitches onto your left forearm.
- Continue with the second row.
- This time you hold the yarn in your left hand, the same side holding all the stitches.
- With your right hand, slide the loop closest to your left hand over the yarn. This creates a loop.
- Place that loop on your right forearm.
- Continue so all stitches on the left are arm knitted on to the right.
- Knit how many rows you like until your desired length is achieved.
- To cast off, follow these steps.
- It doesn’t matter which side your stitches are on. But let’s say they’re on your left arm.
- Knit your first stitch, then knit the second stitch onto your right arm.
- With these 2 stitches, you need to bring the first knitted stitch over the second knitted stitch, leaving you with one stitch on your right arm.
- This is like binding off when knitting with needles.
- Knit another stitch over to your right arm.
- Bring the stitch that was on your right arm over the newly knitted stitch. You have one stitch on your right arm.
- Continue with this method until you have bound off all the stitches.
- Put the yarn through the last loop and pull tightly
- This keeps the stitches from unraveling.
- Weave in the ends. You can do this with your fingers
- Cut off the excess.
- Your arm knitted scarf is now complete
For a fabulous easy to follow tutorial, watch Chandi from Expression Fiber Arts video below:
Prefer to make an arm knit blanket? Follow these steps, and you’ll have a gorgeous arm knit blanket in under one hour (give or take). Before you begin, ensure you’ve blocked out about one hour where you won’t be disturbed.
It’s hard to stop midway when arm knitting. Have a drop sheet over any carpet and be in clothes you don’t mind getting some fluff on. The yarn may not shed, but it’s better to be prepared.
Pin For Later

How To Arm Knit A Blanket
- Unravel about a 5-6ft length of yarn for your tail. Make a slip knot on your right forearm.
- Create a V-shape with the working yarn (working yarn is the skein of yarn) and the tail with your left hand.
- Push your right hand under the working yarn on the left hand. Pull the yarn from the tail through the loop. Take the loop and pull it over your right arm.
- Keep casting the stitches on your right forearm. Make it tight, but not too tight. You need to continue this until you cast on 25 stitches on your right forearm.
- Once you’re done with 25 stitches, start over on your left forearm. Hold the working yarn in your right hand and pull off the first stitch over the working yarn. Create a loop with the working yarn and over your left hand.
- Continue taking the stitches until all are on your left forearm.
- Keep knitting from left to right, then right to left until you have about 34-38 rows or until you’re happy with the length.
- To join the ends to continue knitting, tie them together with the least amount of yarn.
- Pull the knot tight
- Once the ends are tied, continue knitting
Learn how to tie ends together with this video.
- Once you’ve reached your desired length, the last step is to cast off.
- Knit two stitches from your left arm to your right arm, as you did all until this point. Then slip the first stitch over the second. This is very similar to casting off with needles.
- Knit another stitch on your right arm. Then slip the previous stitch over the last one. Continue until you only have one loop left.
- Cut off the working yarn, pull it over and tie a knot.
- To hide the tails, weave them into your blanket.
- Trim of any excess yarn where you’ve tied knots to join the yarn.
- Ta-Da! You have your arm knitted blanket.
FAQS About Arm Knitting
How Can I Make Tighter Stitches?
To make tighter stitches try keeping the stitches close as possible to your hand. Pull the yarn as you go for each stitch but not so tight it’s uncomfortable. Remember, arm knitting produces looser, bigger stitches. With a few tries, your tension improves, have patience.
How Do You Knit With Multiple Strands Of Yarn?
To knit with multiple strands of yarn, find up to 4 bulky yarns. Pull out the strands from each ball and bring them together. As you’re knitting, keep all the yarns together, and each knit stitch is the combination of those fibers. Enjoy making a unique look with multiple strands of yarn.
Conclusion
Hope this helped you. Enjoy making arm knitted projects! To learn more on the topic, see my guide to related knitting books here. Want to learn another method of knitting? See my post on the brioche knitting technique.

Can you stop midway through when you are arm knitting?
Hi Jake, you can but most people’s experience is it is best not to. A tip from other arm knitters is to have Saran wrap/Plastic wrap ready for when you take a break from your arm knitting. You thread this through your stitches, then tie the two ends of the plastic wrap together to stop the stitches from coming off. Cheers Jodie
Do arm knitted blankets loose their shape after a while?
Hi Maddie, good question. From my reading, most people say that a blanket that is used as a decor item only doesn’t tend to change very much. This is because it is not used regularly as a blanket. Expect some changes particularly after lots of use and time.
I had a friend arm knit me a blanket with a very slick yarn. It slides and loses it shape easily. Is there a remedy for this? I have thought about sewing the crossovers together, but that would take a very long time and I don’t know if it would hold.
Hi Dawn. Thanks for getting in touch. I don’t know of any remedy to stop the yarn loosing it’s shape easily as it sounds from your description that yarn is slippery and doesn’t hold its shape. Sorry I couldn’t be more help. Cheers Jodie